初めに
Railsチュートリアルの3~14章のコードを私の理解とともに読み進めていく、という試みのもとこのエントリーを書いております 💪
間違いなどあればコメントでご指摘いただけると幸いです 😊
環境
Ruby: 2.6.3 Rails: 6.0.4 エディタ: RubyMine (cloud9ではなく、ローカル) M1 mac mini
3章
3.1 セットアップ
ここから14章まで触っていくsample-appのセットアップをしていきます.
$ cd ~/environment
$ rails _6.0.4_ new sample_app
$ cd sample_app/
任意のプロジェクトに移動して、新しいrailsアプリケーションを作成し、該当ディレクトリに移動します.
※この時点で git commit -am 'Initial commit' など行ってもいいと思います.
source 'https://rubygems.org'
git_source(:github) { |repo| "https://github.com/#{repo}.git" }

gem 'rails',      '6.0.4'
gem 'puma',       '4.3.6'
gem 'sass-rails', '5.1.0'
gem 'webpacker',  '4.0.7'
gem 'turbolinks', '5.2.0'
gem 'jbuilder',   '2.9.1'
gem 'bootsnap',   '1.10.3', require: false

group :development, :test do
  gem 'sqlite3', '1.4.1'
  gem 'byebug',  '11.0.1', platforms: [:mri, :mingw, :x64_mingw]
end

group :development do
  gem 'web-console',           '4.0.1'
  gem 'listen',                '3.1.5'
  gem 'spring',                '2.1.0'
  gem 'spring-watcher-listen', '2.0.1'
end

group :test do
  gem 'capybara',                 '3.28.0'
  gem 'selenium-webdriver',       '3.142.4'
  gem 'webdrivers',               '4.1.2'
  gem 'rails-controller-testing', '1.0.4'
  gem 'minitest',                 '5.11.3'
  gem 'minitest-reporters',       '1.3.8'
  gem 'guard',                    '2.16.2'
  gem 'guard-minitest',           '2.4.6'
end

group :production do
  gem 'pg', '1.1.4'
end
Gemを追加したり、バージョンの指定をしたので bundle install を行います.
$ bundle _2.2.17_ config set --local without 'production'
私の環境ではここでbundler がないとのエラーが出たので、 gem install bundler:2.2.17 として、エラーを解消した上で上記のコードを実行しました.
$ bundle _2.2.17_ install
実行すると以下のエラーが表示されました.
You have requested:
  listen = 3.1.5

The bundle currently has listen locked at 3.7.1.
Try running `bundle update listen`

If you are updating multiple gems in your Gemfile at once,
try passing them all to `bundle update`
いろんなgemのバージョンを変えたなら、bundle update してとのことなので、その通りにした結果、正常にupdateが終わりました.
$ rails webpacker:install
webpackerのインストールを行います. webpackerはJavaScript開発に必要なファイル群をまとめてくれるnodeモジュールですね.
チュートリアルにある通り、上書きされるか問われたので全てnoと回答して進めていきます.
$ git init
$ git add -A
$ git commit -m "Initialize repository"
ここまでの作業を一度commitします.
# Ruby on Rails チュートリアルのサンプルアプリケーション これは、次の教材で作られたサンプルアプリケーションです。 [*Ruby on Rails チュートリアル*](https://railstutorial.jp/) (第6版) [Michael Hartl](https://www.michaelhartl.com/) 著 ## ライセンス [Ruby on Rails チュートリアル](https://railstutorial.jp/)内にある ソースコードはMITライセンスとBeerwareライセンスのもとで公開されています。 詳細は [LICENSE.md](LICENSE.md) をご覧ください。 ## 使い方 このアプリケーションを動かす場合は、まずはリポジトリを手元にクローンしてください。 その後、次のコマンドで必要になる RubyGems をインストールします。$ gem install bundler -v 2.2.17 $ bundle _2.2.17_ config set --local without 'production' $ bundle _2.2.17_ installその後、データベースへのマイグレーションを実行します。$ rails db:migrate最後に、テストを実行してうまく動いているかどうか確認してください。$ rails testテストが無事に通ったら、Railsサーバーを立ち上げる準備が整っているはずです。$ rails server詳しくは、[*Ruby on Rails チュートリアル*](https://railstutorial.jp/) を参考にしてください。
$ git commit -am "Improve the README"
README.md を修正し、commitします.
$ git remote add origin https://github.com/<あなたのGitHubアカウント名>/sample_app.git
$ git push -u origin master
リモートリポジトリを作成し、pushします. 2020年からGitHubの新規リポジトリのデフォルトブランチがmasterではなく、mainになっているので、push先はmain に変えてもいいと思います.
class ApplicationController < ActionController::Base
  def hello
    render html: "hello, world!"
  end
end
Rails.application.routes.draw do
  root 'application#hello'
end
controller にはhtml形式で hello, world! を返す (renderする) helloアクションを記述し、routes には '/' にアクセスした時に application_controllerのhelloアクションが実行されるように記述されてます.
$ git commit -am "Add hello"
$ git push
$ heroku create
$ git push heroku master
コミットしてGitHubへプッシュし、herokuアプリケーションを作成して、herokuへpushしています. デフォルトブランチを main とした方は mainでpushしましょう.
herokuへpushした時に以下のエラーが発生しました.
remote: -----> Installing dependencies using bundler 2.3.10
remote:        Running: BUNDLE_WITHOUT='development:test' BUNDLE_PATH=vendor/bundle BUNDLE_BIN=vendor/bundle/bin BUNDLE_DEPLOYMENT=1 bundle install -j4
remote:        Your bundle only supports platforms ["-darwin-21"] but your local platform is
remote:        x86_64-linux. Add the current platform to the lockfile with
remote:        `bundle lock --add-platform x86_64-linux` and try again.
remote:        Bundler Output: Your bundle only supports platforms ["-darwin-21"] but your local platform is
remote:        x86_64-linux. Add the current platform to the lockfile with
remote:        `bundle lock --add-platform x86_64-linux` and try again.
remote:
remote:  !
remote:  !     Failed to install gems via Bundler.
remote:  !
remote:  !     Push rejected, failed to compile Ruby app.
remote:
remote:  !     Push failed
remote: Verifying deploy...
remote:
remote: !   Push rejected to vast-anchorage-16661.
remote:
To https://git.heroku.com/vast-anchorage-16661.git
 ! [remote rejected] main -> main (pre-receive hook declined)
error: failed to push some refs to 'https://git.heroku.com/vast-anchorage-16661.git'
読んでいくと、ローカルのプラットフォームとlockfileにあるプラットフォームが違う(足りてない)と言われてますね.
エラーにある通り bundle lock --add-platform x86_64-linux とすることで解決できそうです.
上記リンクに詳しいです.
commitした上で、もう一度 git push heroku master としてみるとうまくherokuにpushできました.
herokuにアクセスし、pushされてることを確認したら、該当アプリケーションを開いてみます.

先ほど設定した hello, worldが表示されてますね 🎉
3.2 静的ページ
controllerを作成し、静的ページを配信する節です.
$ git checkout -b static-pages
まず新しいブランチにチェックアウトします.
$ rails generate controller StaticPages home help
      create  app/controllers/static_pages_controller.rb
       route  get 'static_pages/help'
       route  get 'static_pages/home'
      invoke  erb
      create    app/views/static_pages
      create    app/views/static_pages/home.html.erb
      create    app/views/static_pages/help.html.erb
      invoke  test_unit
      create    test/controllers/static_pages_controller_test.rb
      invoke  helper
      create    app/helpers/static_pages_helper.rb
      invoke    test_unit
      invoke  assets
      invoke    coffee
      create      app/assets/javascripts/static_pages.coffee
      invoke    scss
      create      app/assets/stylesheets/static_pages.scss
home help アクションを持つ static_pages_controller.rb とそれに関連するルーティングやページも自動生成されます.
$ git add -A
$ git commit -m "Add a Static Pages controller"
$ git push -u origin static-pages
commitしておきます.
Rails.application.routes.draw do
  get  'static_pages/home'
  get  'static_pages/help'
  root 'application#hello'
end
2行目を例に取ると、static_pages/homeというURLに対するgetリクエストをStaticPagesコントローラーのhomeアクションと結び付けてます.
$ rails s
サーバーを立てて、 http://localhost:3000/static_pages/home にアクセスすると以下のようなエラーが出ました.

こちらは以下のリンクのことを試すことで解決できました. - `Webpacker::Manifest::MissingEntryError` のエラーが出た時の対処法 - 徒然

class StaticPagesController < ApplicationController
  def home
  end

  def help
  end
end
static_pages_controller.rb に home と help アクションが定義されているのが確認できます.
Rails はこの記述だけで /static_pages/home にアクセスすると、homeアクションに記述されているコードを実行してくれます. 返すものが指定されてない場合は、対応するviewファイルを返します.
<h1>StaticPages#home</h1>
<p>Find me in app/views/static_pages/home.html.erb</p>
<h1>StaticPages#help</h1>
<p>Find me in app/views/static_pages/help.html.erb</p>
home、help アクションでそれぞれ返される viewファイルですね.
<h1>Sample App</h1>
<p>
  This is the home page for the
  <a href="https://railstutorial.jp/">Ruby on Rails Tutorial</a>
  sample application.
</p>
<h1>Help</h1>
<p>
  Get help on the Ruby on Rails Tutorial at the
  <a href="https://railstutorial.jp/help">Rails Tutorial help page</a>.
  To get help on this sample app, see the
  <a href="https://railstutorial.jp/#ebook"><em>Ruby on Rails Tutorial</em>
  book</a>.
</p>
両ファイルを少し変更していますね.
3.3 テストから始める
TDD(テスト駆動開発) を試そうという節です.
$ ls test/controllers/
static_pages_controller_test.rb
自動生成された startic_pages_controller_test.rb があることを確認していますね.
require 'test_helper'

class StaticPagesControllerTest < ActionDispatch::IntegrationTest

  test "should get home" do
    get static_pages_home_url
    assert_response :success
  end

  test "should get help" do
    get static_pages_help_url
    assert_response :success
  end
end
minitestが書かれてますね.
例えば一つ目のテストは、static_pages_homeにgetしたら200が返ってくるテストです.
$ rails db:migrate     # システムによっては必要
$ rails test
2 tests, 2 assertions, 0 failures, 0 errors, 0 skips
migrationを走らせ、テストを実行しています. この時点では全てGREENになりそうです.
require 'test_helper'

class StaticPagesControllerTest < ActionDispatch::IntegrationTest

  test "should get home" do
    get static_pages_home_url
    assert_response :success
  end

  test "should get help" do
    get static_pages_help_url
    assert_response :success
  end

  test "should get about" do
    get static_pages_about_url
    assert_response :success
  end
end
最後のテストを追加してます. 現状 static_pages_about_urlはないので、REDになるでしょう.
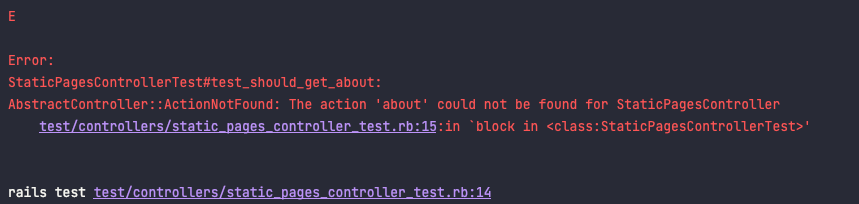
$ rails test
3 tests, 2 assertions, 0 failures, 1 errors, 0 skips
予想通り一つはエラーになりましたね.

エラーを見てみると、 static_pages_about_urlがない と言われているようなので、routingに追加します.
Rails.application.routes.draw do
  get  'static_pages/home'
  get  'static_pages/help'
  get  'static_pages/about' # 追加
  root 'application#hello'
end
 ここでテストを実行してみるとエラーが変わっているのが確認できます.
 aboutアクションがない と言われているので追加します.
class StaticPagesController < ApplicationController

  def home
  end

  def help
  end

  # 追加
  def about
  end
end
テストを実行してみましょう.

エラーが変わりました. templateがない と言われています. つまり、表示するviewがないということなので、viewを作成します.
$ touch app/views/static_pages/about.html.erb
<h1>About</h1>
<p>
  <a href="https://railstutorial.jp/">Ruby on Rails Tutorial</a>
  is a <a href="https://railstutorial.jp/#ebook">book</a> and
  <a href="https://railstutorial.jp/screencast">screencast</a>
  to teach web development with
  <a href="https://rubyonrails.org/">Ruby on Rails</a>.
  This is the sample application for the tutorial.
</p>
ここでテストを実行してみます.

成功しました 🎉
3.4 少しだけ動的なページ
layoutの仕組みと、動的なページを学ぶ節です.
$ mv app/views/layouts/application.html.erb layout_file
練習のためにaplication.html.erb を移動します. 実際のアプリケーションではほとんどしない動作ですが、練習のために行います.
require 'test_helper'

class StaticPagesControllerTest < ActionDispatch::IntegrationTest

  test "should get home" do
    get static_pages_home_url
    assert_response :success
    assert_select "title", "Home | Ruby on Rails Tutorial Sample App" # 追加
  end

  test "should get help" do
    get static_pages_help_url
    assert_response :success
    assert_select "title", "Help | Ruby on Rails Tutorial Sample App" # 追加
  end

  test "should get about" do
    get static_pages_about_url
    assert_response :success
    assert_select "title", "About | Ruby on Rails Tutorial Sample App" # 追加
  end
end
titleタグの中に該当する文字列があるかチェックするテストを追加しました.
実行してみると、当然REDになります. assertionが 6つに対して、REDが3つですね.
$ rails test
3 tests, 6 assertions, 3 failures, 0 errors, 0 skips
次にタイトルを追加します.
<!DOCTYPE html>
<html>
  <head>
    <title>Home | Ruby on Rails Tutorial Sample App</title>
  </head>
  <body>
    <h1>Sample App</h1>
    <p>
      This is the home page for the
      <a href="https://railstutorial.jp/">Ruby on Rails Tutorial</a>
      sample application.
    </p>
  </body>
</html>
これでタブの名前が /static_pages/home にアクセスした時のタブの名前が Home | Ruby on Rails Tutorial Sample App になったはずです.
help, aboutページも同様に修正を加えます.
<!DOCTYPE html>
<html>
  <head>
    <title>Help | Ruby on Rails Tutorial Sample App</title>
  </head>
  <body>
    <h1>Help</h1>
    <p>
      Get help on the Ruby on Rails Tutorial at the
      <a href="https://railstutorial.jp/help">Rails Tutorial help
      page</a>.
      To get help on this sample app, see the
      <a href="https://railstutorial.jp/#ebook">
      <em>Ruby on Rails Tutorial</em> book</a>.
    </p>
  </body>
</html>
<!DOCTYPE html>
<html>
  <head>
    <title>About | Ruby on Rails Tutorial Sample App</title>
  </head>
  <body>
    <h1>About</h1>
    <p>
      <a href="https://railstutorial.jp/">Ruby on Rails Tutorial</a>
      is a <a href="https://railstutorial.jp/#ebook">book</a> and
      <a href="https://railstutorial.jp/screencast">screencast</a>
      to teach web development with
      <a href="https://rubyonrails.org/">Ruby on Rails</a>.
      This is the sample application for the tutorial.
    </p>
  </body>
</html>
これでテストはGREENになりそうです.
$ rails test
3 tests, 6 assertions, 0 failures, 0 errors, 0 skips
GREENになりました.
演習でtestにてsetupを使ってみましょうとあるので、やってみます.
require 'test_helper'

class StaticPagesControllerTest < ActionDispatch::IntegrationTest

  # 追加
  def setup
    @base_title = "Ruby on Rails Tutorial Sample App"
  end

  test "should get home" do
    get static_pages_home_url
    assert_response :success
    assert_select "title", "Home | #{@base_title}" # 修正
  end

  test "should get help" do
    get static_pages_help_url
    assert_response :success
    assert_select "title", "Help | #{@base_title}" # 修正
  end

  test "should get about" do
    get static_pages_about_url
    assert_response :success
    assert_select "title", "About | #{@base_title}" # 修正
  end
end
setupにテスト前に実行する処理を記述してます. これでテストが見やすくなりました.
<% provide(:title, "Home") %>
<!DOCTYPE html>
<html>
  <head>
    <title><%= yield(:title) %> | Ruby on Rails Tutorial Sample App</title>
  </head>
  <body>
    <h1>Sample App</h1>
    <p>
      This is the home page for the
      <a href="https://railstutorial.jp/">Ruby on Rails Tutorial</a>
      sample application.
    </p>
  </body>
</html>
provideメソッドで第一引数の:titleというラベルと、第二引数の文字列"Home" を関連づけています. これによりyiled(:label) とすることでラベルで関連付けされたオブジェクトが呼び出せます.
help, aboutも同じように修正します.
<% provide(:title, "Help") %>
<!DOCTYPE html>
<html>
  <head>
    <title><%= yield(:title) %> | Ruby on Rails Tutorial Sample App</title>
  </head>
  <body>
    <h1>Help</h1>
    <p>
      Get help on the Ruby on Rails Tutorial at the
      <a href="https://railstutorial.jp/help">Rails Tutorial help
      section</a>.
      To get help on this sample app, see the
      <a href="https://railstutorial.jp/#ebook">
      <em>Ruby on Rails Tutorial</em> book</a>.
    </p>
  </body>
</html>
<% provide(:title, "About") %>
<!DOCTYPE html>
<html>
  <head>
    <title><%= yield(:title) %> | Ruby on Rails Tutorial Sample App</title>
  </head>
  <body>
    <h1>About</h1>
    <p>
      <a href="https://railstutorial.jp/">Ruby on Rails Tutorial</a>
      is a <a href="https://railstutorial.jp/#ebook">book</a> and
      <a href="https://railstutorial.jp/screencast">screencast</a>
      to teach web development with
      <a href="https://rubyonrails.org/">Ruby on Rails</a>.
      This is the sample application for the tutorial.
    </p>
  </body>
</html>
3つのviewファイルを見比べてみるとbodyの中身以外は同じです. つまり Railsの原則DRYに反しています. 修正していきましょう.
$ mv layout_file app/views/layouts/application.html.erb
移動していたapplication.html.erbを戻し、titleを修正します.
<!DOCTYPE html>
<html>
  <head>
    <title><%= yield(:title) %> | Ruby on Rails Tutorial Sample App</title> # 追加
    <%= csrf_meta_tags %>
    <%= csp_meta_tag %>
    <%= stylesheet_link_tag    'application', media: 'all',
                               'data-turbolinks-track': 'reload' %>
    <%= javascript_pack_tag    'application',
                               'data-turbolinks-track': 'reload' %>
  </head>

  <body>
    <%= yield %>
  </body>
</html>
これでそれぞれのerbファイルがbodyのyieldに挿入され、でラベル:titleと関連付けされたオブジェクトが yield(:title)に入るはずです.
home, help, about から余計な記述を削除することができるようになったのでそれぞれ修正します.
<% provide(:title, "Home") %>
<h1>Sample App</h1>
<p>
  This is the home page for the
  <a href="https://railstutorial.jp/">Ruby on Rails Tutorial</a>
  sample application.
</p>
<% provide(:title, "Help") %>
<h1>Help</h1>
<p>
  Get help on the Ruby on Rails Tutorial at the
  <a href="https://railstutorial.jp/help">Rails Tutorial help page</a>.
  To get help on this sample app, see the
  <a href="https://railstutorial.jp/#ebook"><em>Ruby on Rails Tutorial</em>
  book</a>.
</p>
<% provide(:title, "About") %>
<h1>About</h1>
<p>
  <a href="https://railstutorial.jp/">Ruby on Rails Tutorial</a>
  is a <a href="https://railstutorial.jp/#ebook">book</a> and
  <a href="https://railstutorial.jp/screencast">screencast</a>
  to teach web development with
  <a href="https://rubyonrails.org/">Ruby on Rails</a>.
  This is the sample application for the tutorial.
</p>
これでテストを実行するとGREENになるはずです.
$ rails test
3 tests, 6 assertions, 0 failures, 0 errors, 0 skips
演習
要件はcontactページを作成してくださいとのことなので、まず先に
- get したら 200が返ってくる
- ページには Contact | Ruby on Rails Tutorial Sample App というタイトルが存在する
というテストを書きます
require 'test_helper'

class StaticPagesControllerTest < ActionDispatch::IntegrationTest
  def setup
    @base_title = "Ruby on Rails Tutorial Sample App"
  end

  test "should get home" do
    get static_pages_home_url
    assert_response :success
    assert_select "title", "Home | #{@base_title}"
  end

  test "should get help" do
    get static_pages_help_url
    assert_response :success
    assert_select "title", "Help | #{@base_title}"
  end

  test "should get about" do
    get static_pages_about_url
    assert_response :success
    assert_select "title", "About | #{@base_title}"
  end

  # 追加
  test "should get contact" do
    get static_pages_contact_url
    assert_response :success
    assert_select "title", "Contact | #{@base_title}"
  end
end
次にテストが通るように、ルーティング、コントローラ、ビューの順で修正していきます.
Rails.application.routes.draw do
  get 'static_pages/home'
  get 'static_pages/help'
  get 'static_pages/about'
  get 'static_pages/contact' # 追加
  root 'application#hello'
end
class StaticPagesController < ApplicationController
  def home
  end

  def help
  end

  def about
  end

  # 追加
  def contact
  end
end
<% provide(:title, "Contact") %>
<h1>Contact</h1>
<p>
  Contact the Ruby on Rails Tutorial about the sample app at the
  <a href="https://railstutorial.jp/contact">contact page</a>.
</p>
これでテストが通るはずです.

また、rootがhelloになってるので、これもhomeに修正します. application_controller.rb にhelloアクションがあれば削除します.
Rails.application.routes.draw do
  root 'static_pages#home' # 修正
  get  'static_pages/home'
  get  'static_pages/help'
  get  'static_pages/about'
end
これで / にgetリクエストした場合、static_pagesのhomeアクションにルーティングされます.
演習
- rootルーティングのテストを書いてください
  test "should get root" do
    get root_url
    assert_response :success
    assert_select "title", "Home | #{@base_title}"
  end
とかいてあげるとテストが通ります.
3.5最後に
ブランチの差分をmain(master)ブランチにマージして、herokuにpushする節です.
$ git add -A
$ git commit -m "Finish static pages"
$ git checkout master
$ git merge static-pages
$ git push
コミットして、masterにマージし、GitHubにプッシュしてます.
$ rails test
$ git push heroku
最後にtestを実行し、herokuにプッシュしています.
3.6 高度なセットアップ
testを使いやすくする節です.
ENV['RAILS_ENV'] ||= 'test'
require_relative '../config/environment'
require 'rails/test_help'
require "minitest/reporters" # 追加
Minitest::Reporters.use! # 追加

class ActiveSupport::TestCase
  # 特定のワーカーではテストをパラレル実行する
  parallelize(workers: :number_of_processors)

  # すべてのテストがアルファベット順に実行されるよう、
  #test/fixtures/*.ymlにあるすべてのfixtureをセットアップする
  fixtures :all

  # (すべてのテストで使うその他のヘルパーメソッドは省略)
end

次にテストを自動で監視することができるguardを使って自動的にテストを実行できるようにします.
$ bundle exec guard init
Writing new Guardfile to /home/ec2-user/environment/sample_app/Guardfile
00:51:32 - INFO - minitest guard added to Guardfile, feel free to edit it
# Guardのマッチング規則を定義
guard :minitest, spring: "bin/rails test", all_on_start: false do
  watch(%r{^test/(.*)/?(.*)_test\.rb$})
  watch('test/test_helper.rb') { 'test' }
  watch('config/routes.rb') { interface_tests }
  watch(%r{app/views/layouts/*}) { interface_tests }
  watch(%r{^app/models/(.*?)\.rb$}) do |matches|
    "test/models/#{matches[1]}_test.rb"
  end
  watch(%r{^app/controllers/(.*?)_controller\.rb$}) do |matches|
    resource_tests(matches[1])
  end
  watch(%r{^app/views/([^/]*?)/.*\.html\.erb$}) do |matches|
    ["test/controllers/#{matches[1]}_controller_test.rb"] +
    integration_tests(matches[1])
  end
  watch(%r{^app/helpers/(.*?)_helper\.rb$}) do |matches|
    integration_tests(matches[1])
  end
  watch('app/views/layouts/application.html.erb') do
    'test/integration/site_layout_test.rb'
  end
  watch('app/helpers/sessions_helper.rb') do
    integration_tests << 'test/helpers/sessions_helper_test.rb'
  end
  watch('app/controllers/sessions_controller.rb') do
    ['test/controllers/sessions_controller_test.rb',
     'test/integration/users_login_test.rb']
  end
  watch('app/controllers/account_activations_controller.rb') do
    'test/integration/users_signup_test.rb'
  end
  watch(%r{app/views/users/*}) do
    resource_tests('users') +
    ['test/integration/microposts_interface_test.rb']
  end
end

# 与えられたリソースに対応する統合テストを返す
def integration_tests(resource = :all)
  if resource == :all
    Dir["test/integration/*"]
  else
    Dir["test/integration/#{resource}_*.rb"]
  end
end

# インターフェースが該当するすべてのテストを返す
def interface_tests
  integration_tests << "test/controllers/"
end

# 与えられたリソースに対応するコントローラのテストを返す
def controller_test(resource)
  "test/controllers/#{resource}_controller_test.rb"
end

# 与えられたリソースに対応するすべてのテストを返す
def resource_tests(resource)
  integration_tests(resource) << controller_test(resource)
end
これで bundle exec guard を実行しておくと、自動でテストが実行されるようになります.
終わりに
ほぼ全てのコードを書いていくと、こんな長いエントリーになってしましました 😂
4章以降は特にエラーが出たとこや、気になって調べたことを中心にまとめたいと思います 💪